GraphQL is a new standard for defining, querying and documenting APIs in a human-friendly way, with built-in documentation, a friendly query language and a bunch of tools to help you get started ⚡️
If you’ve used Buildkite then you’ve used GraphQL—we’ve been driving almost all front-end development through our public GraphQL endpoint (graphql.buildkite.com) 🔨
I’ll show you how use GraphQL to create scheduled builds on Buildkite—a feature that isn’t even available yet via the web UI! ✨
GraphiQL: the GraphQL explorer
To make it easier to test, explore and experiment with the API we’ve set up graphql.buildkite.com/explorer running GraphiQL, an official open-source GraphQL project, which gives you a code editor with auto-complete and inline documentation.

To use the explorer you’ll first need a Buildkite account, and a Buildkite API Access Token.
Your first query
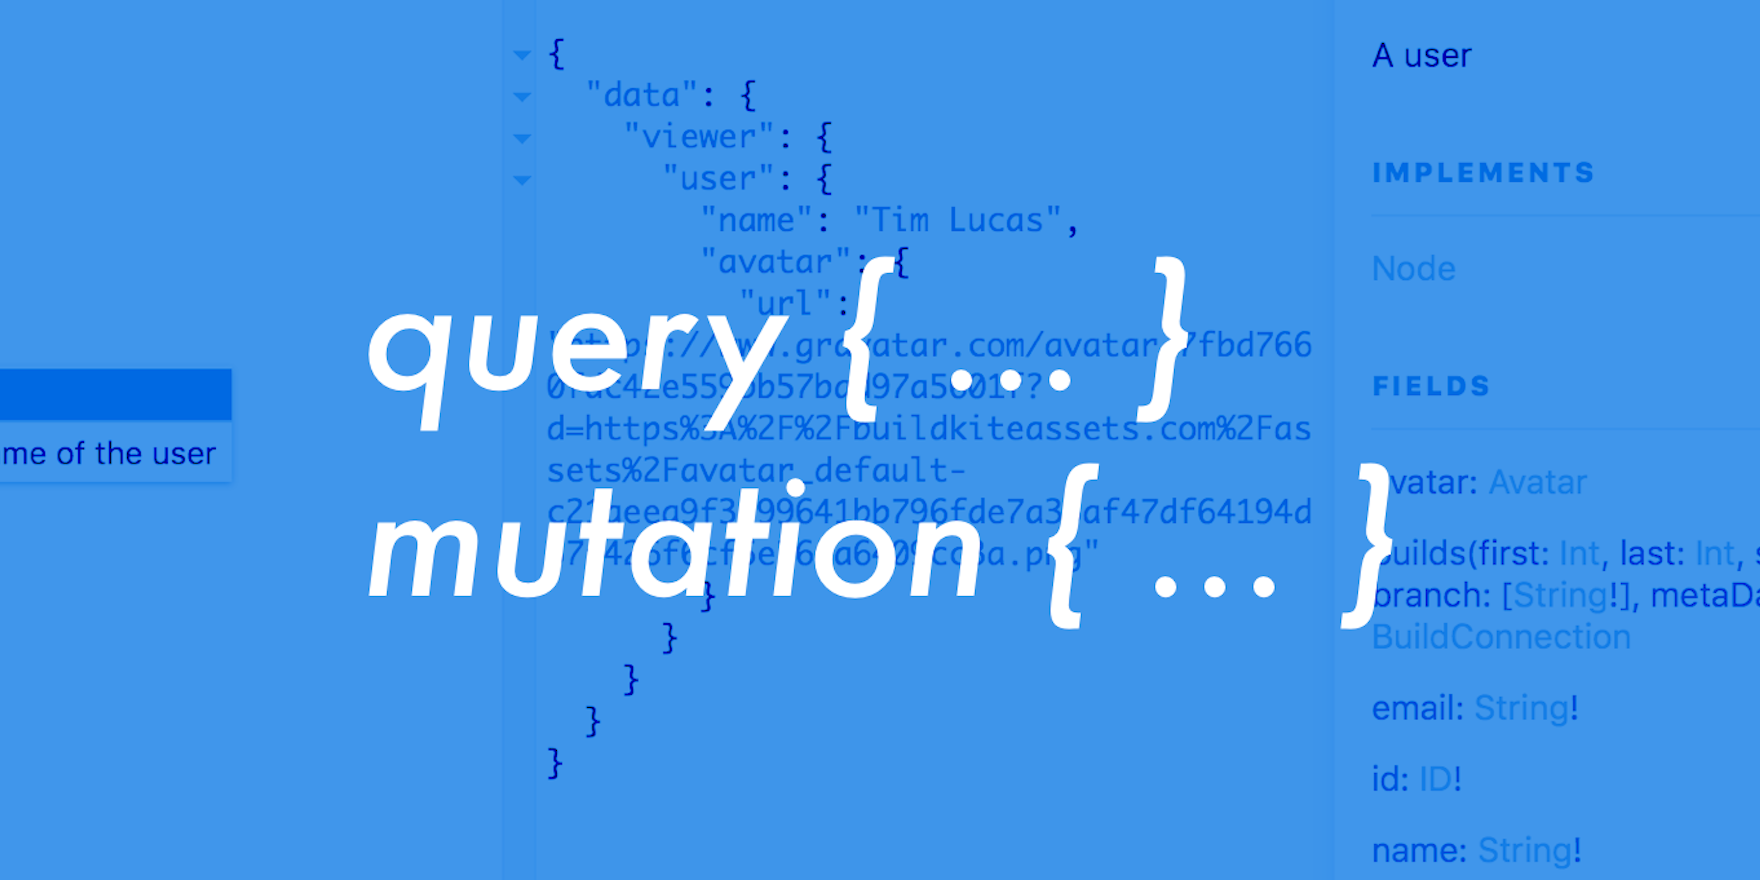
The following is a basic GraphQL query that requests the name of the current user (the account attached to the API Access Token, i.e. you!)
query {
  viewer {
    user {
      name
    }
  }
}
Running that in the GraphQL explorer returns:
{
  "data": {
    "viewer": {
      "user": {
        "name": "Tim Lucas"
      }
    }
  }
}
But that almost feels too easy. Let’s do it the hard way using cURL:
$ curl 'https://graphql.buildkite.com/v1' \
       -H 'Authorization: Bearer xxxxxxx' \
       -d '{
         "query": "query { viewer { user { name } } }"
       }'
{
  "data": {
    "viewer": {
      "user": {
        "name": "Tim Lucas"
      }
    }
  }
}
As you can see there’s very little magic going on. It’s a simple HTTP request (HTTP/2 when run in the browser) which sends some JSON and returns JSON. This simplicity is by design—GraphQL was made to be human friendly and empower people to easily use, explore, integrate with APIs.
Let’s extend the query to add more data. What else can we query on the user? Using the GraphiQL docs panel we can search for “user” and see the other fields we can use:

You’ll notice the “builds” field returns a “BuildConnection”. In GraphQL (and Relay) this is a common pattern for collections of objects, and it requires you to add two special fields: “edges” and “node”.
To fetch your last build we can use the following GraphQL query:
query {
  viewer {
    user {
      name
      builds(first: 1) {
        edges {
          node {
            number
            branch
            message
          }
        }
      }
    }
  }
}
The “edges” and “node” fields help to provide pagination and counting. And we’ve passed the argument called “first” a value of “1”, which will cause the most recently created build to be returned.
Run the query in the GraphiQL and, assuming you’ve created a build in Buildkite, you’ll see your build appear 📦
Variables
In HTTP requests you have query strings and request bodies to pass in data to APIs. In GraphQL you can insert data directly into the query, like we did above for “first: 1”, but a better way is to use variables.
We’ll change the builds query to make the number 1 into a variable called “numberOfBuilds”.
To use a variable you first need to add it to the top of the query like so:
query($numberOfBuilds:Int!) {This specifies the type (everything in GraphQL is strongly typed), and the exclamation mark says that it’s required (the query won’t run unless the variable is passed in).
The entire query now looks like this:
query($numberOfBuilds:Int!) {
  viewer {
    user {
      name
      builds(first: $numberOfBuilds) {
        edges {
          node {
            number
            branch
            message
          }
        }
      }
    }
  }
}
To execute this query you’ll need to pass in the variable using JSON. In GraphiQL there’s a “Query Variables” panel on the bottom left where you can paste or type the variables JSON (and it even auto-completes).
Paste in the following variables JSON, and run the query:
{
  "numberOfBuilds": 1
}
For kicks we can run this same query via curl:
curl 'https://graphql.buildkite.com/v1' \
  -H 'Authorization: Bearer xxxxxxx' \
  -d '{
    "query": "query($numberOfBuilds:Int) { viewer { user { name builds(first: $numberOfBuilds) { edges { node { number branch message } } } } } }",
    "variables": { "numberOfBuilds": 1 }
  }'
Mutations
The final piece of the GraphQL puzzle is mutations. These are the equivalent to the POST, PUT, PATCH and DELETE in HTTP/REST speak. We’ll use a mutation to create a scheduled build.
In the documentation sidebar you’ll find the “pipelineScheduleCreate” mutation. A pipeline schedule defines when a build for a pipeline should be automatically created—such as creating a nightly build, or a daily performance analysis, or a daily ops task.

If you click on the “input” argument you’ll see the fields that the “pipelineScheduleCreate” mutation is expecting:

Even though only the “pipelineID” field is marked as required (because it has an exclamation mark), for this mutation you’ll actually need to pass “pipelineID” (the GraphQL ID of the pipeline you want to create a schedule for), “label” (to help identify the schedule to your team), and “cronline” (when the schedule should run a build).
The “cronline” parameter is specified using Cron syntax. If you’re new to cron, or if your brain is like mine and doesn’t speak fluent cron, you can use crontab.guru:

So we’ve got our “cronline” field sorted, but what value do we use for the “pipelineID” field? Let’s run the following query to find the pipeline by slug and return the id:
query {
  pipeline(slug:"kitty-cat-inc/ios-app") {
    id
  }
}
Running the query will show us the id:
{
  "data": {
    "pipeline": {
      "id": "UGlwZWxpbmUtLS02MzliNWJjOC0wMGZmLT"
    }
  }
}
Now we have everything we need to create the schedule using the “pipelineScheduleCreate” mutation. Here’s the final GraphQL mutation we’ll need:
mutation($schedule:PipelineScheduleCreateInput!) {
  pipelineScheduleCreate(input:$schedule) {
    pipelineScheduleEdge {
      node {
        label
        nextBuildAt
        cronline
      }
    }
  }
}
Looking at the above query, all the input data is passed in using a “$schedule” variable (which we’ll define below). Between the {} of the mutation you’ll see a “node” field: this refers to the data you want returned once the mutation is complete. In this case it will return the label, next build time, and cronline of the newly created schedule.
Let’s fill out the schedule query variables with some values:
{
 "schedule": {
    "pipelineID": "UGlwZWxpbmUtLS02MzliNWJjOC0wMGZmLT",
    "cronline": "@midnight",
    "label": "Nightly build"
  }
}
Running the mutation has created and returned a new build schedule 🎉
Here’s how to run that same mutation using cURL:
$ curl 'https://graphql.buildkite.com/v1' \
  -H 'authorization: Bearer xxxxxxx' \
  -d '{
    "query": "mutation($schedule:PipelineScheduleCreateInput!) { pipelineScheduleCreate(input:$schedule) { pipelineScheduleEdge { node { label nextBuildAt cronline } } } }",
    "variables": {
      "schedule": {
        "pipelineID": "UGlwZWxpbmUtLS02MzliNWJjOC0wMGZmLT",
        "cronline": "@midnight",
        "label": "Nightly build"
      }
    }
  }'
Running multiple queries can be a copy-and-paste pain, but luckily we can make it easier by giving them each a name. Once they have a name we can keep them all within the same query window. Let’s name them “FindPipeline” and “CreateSchedule”, and then see what happens when we hit the run button:

To delete the schedule you follow a similar process to creating a schedule: first you find the schedule’s “id”, and then call the “pipelineScheduleDelete” mutation passing in an “input” variable:

If you want to list all the schedules for a pipeline you can do so using a pipeline’s “schedules” field:
query {
  pipeline(slug:"kitty-cat-inc/ios-app") {
    schedules {
      edges {
        node {
          id
          label
          cronline
        }
      }
    }
  }
}
And that’s it! You now know how to find, create and delete scheduled builds using GraphQL query and mutations 💪🎉
Want to learn more?
If you want to learn more about GraphQL there’s an interactive walkthrough at learngraphql.com, or check out the official docs at graphql.org.